Query Service
Overview
The Query Service is a service that enables App Creators easily fetch data from various types of data sources. App Creators will be able to focus on delivering value rather than re-inventing the wheel.
- Able to execute
pre-configuredqueries or new SQL queries within the app directly, rather than creating new query endpoints in the backend. - Useful info of the data sources (tables, columns, sizes), debug functionality and performance metrics will be provided.
- All the functionalities will be incorporated into one single Workflow component.
- Super easy to use for anyone with basic SQL knowledge.
There are two versions of Query Services - internal version and external version. Internal version allows user to access data files that are stored in Dais File System, while external version enables user to connect and fetch data from external data sources outside of Dais. App creators can decide deploy which version or both depending on the app needs.
Note: Current internal version only supports SQLite; external version only supports Snowflake. More data types will be supported in the future, e.g. PostgresSQL, csv, etc.
Deploy
Under Administration/Common Services tab, click “DEPLOY COMMON SERVICE” tab and use the lightning icon to deploy “query-service-internal” or “query-service-external” to your app. You can choose which version to be used in the app; the latest version is always recommended.
If you cannot see the common service you would like to use, please reach out to #dais-support to have it deployed your app/portal.
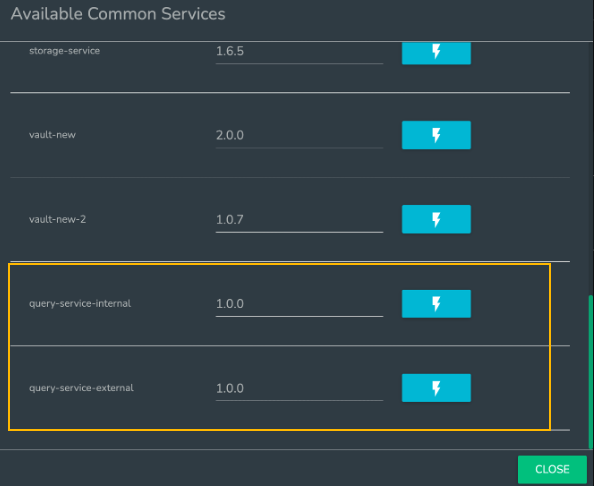
Confirm Deployment
Use the pencil icon to enter Edit mode and choose “Workflows” tab.
Create a new Workflow and make two checks before any further steps.
- In the left panel, find the “Common Services” tab. It contains a list of all the available common services for this app. If the query service has been correctly deployed, the latest available version will be visible in the list.
- In the right panel, confirm that the “Execute query” component is available. If not, please contact #dais-support.
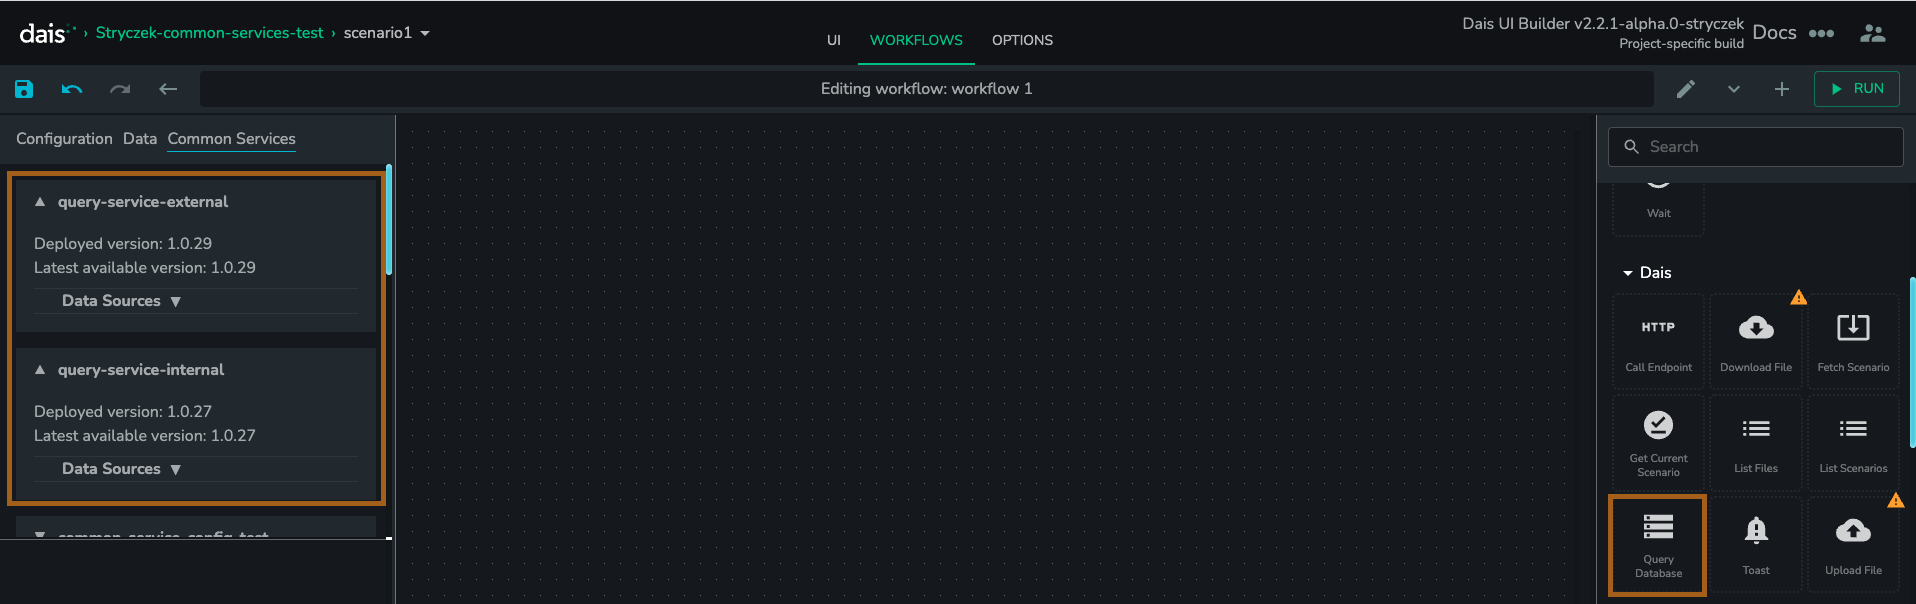
Using the Query Service
Add Data Sources
- Click the “Add” button under “Data Sources”, and enter the required info for the data source you want to use.
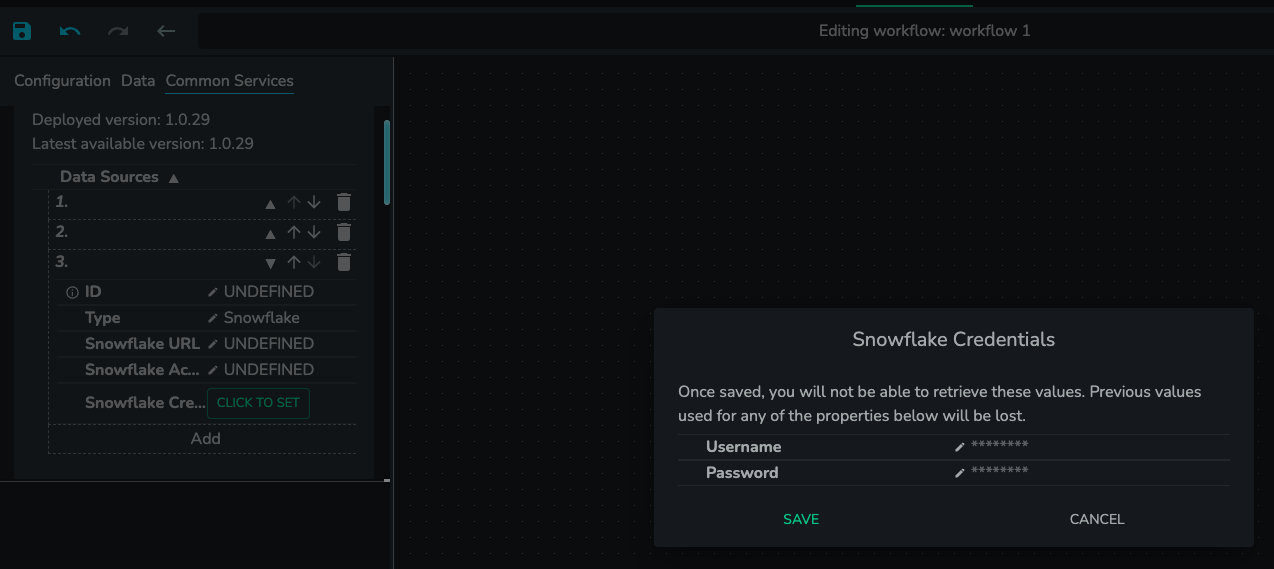
- Hit “Click To Set” button and enter your credentials in the pop-up window. Then click “Save” button.
- Please make sure to also click the “Save” button within "Data Sources" list; otherwise, the data source will not be saved. The “Revert” button can be used to cancel changes.
Notes:
- For the internal query service, data files need to be uploaded into Dais File Manager under /uploads. For example, there is a "chinook.db" file that you want to use as the data source. You need to upload the file to Dais to make sure /uploads/chinook.db exists in File Manager, and simply enter chinook.db" in the SQLite File Name field of query-service tile in workflow.
- There is an "ID" field for each Data Source where app creator needs to enter. Please make sure Data Source IDs are unique throughout both internal and external versions. If the same id is used for an internal data source and an external data source, only one of them will be detected by the "Execute Query" tile.
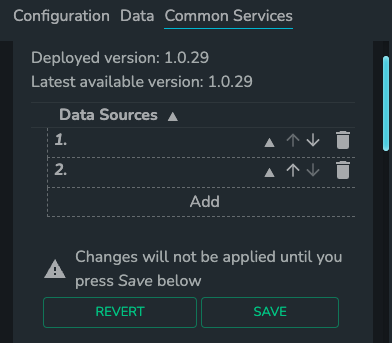
Add Credentials (Optional)
To set credentials for Data Sources, you need to first correctly set up the dais.json file in your repo. An example dais.json is as follows:
{
  "containers": [
    {
      "name": "query-service-external",
      "port": 8081,
      "context": "./query-server",
      "testDockerfile": "test.Dockerfile",
      "version": "1.0.31",
      "capabilities": ["externalInternet"],
      "secretsEnabled": true,
      "configuration": [
        {
          "id": "dataSources",
          "name": "Data Sources",
          "type": "Array",
          "arrayType": "JSON",
          "schema": [
            {
              "id": "id",
              "name": "ID",
              "type": "String",
              "description": "A unique ID to identify this data-source"
            },
            {
              "id": "type",
              "name": "Type",
              "type": "Enum",
              "default": "snowflake",
              "enums": [
                {
                  "id": "snowflake",
                  "label": "Snowflake"
                },
                {
                  "id": "postgres",
                  "label": "PostgreSQL"
                }
              ]
            },
            {
              "id": "snowflakeUrl",
              "name": "Snowflake URL",
              "type": "String",
              "visibleWhen": {
                "type": "snowflake"
              }
            },
            {
              "id": "snowflakeAccount",
              "name": "Snowflake Account",
              "type": "String",
              "visibleWhen": {
                "type": "snowflake"
              }
            },
            {
              "id": "snowflakeCredentials",
              "name": "Snowflake Credentials",
              "type": "SecretObj",
              "schema": [
                {
                  "id": "username",
                  "name": "Username",
                  "type": "String"
                },
                {
                  "id": "password",
                  "name": "Password",
                  "type": "String"
                }
              ],
              "visibleWhen": {
                "type": "snowflake"
              }
            },
            {
              "id": "psqlHostname",
              "name": "PostgreSQL Hostname",
              "type": "String",
              "visibleWhen": {
                "type": "postgres"
              }
            },
            {
              "id": "psqlPort",
              "name": "PostgreSQL Port",
              "type": "String",
              "visibleWhen": {
                "type": "postgres"
              }
            },
            {
              "id": "psqlCredentials",
              "name": "PostgreSQL Credentials",
              "type": "SecretObj",
              "schema": [
                {
                  "id": "username",
                  "name": "Username",
                  "type": "String"
                },
                {
                  "id": "password",
                  "name": "Username",
                  "type": "String"
                }
              ],
              "visibleWhen": {
                "type": "postgres"
              }
            }
          ]
        }
      ]
    }
  ]
}
Make sure you add a json block in dais.json following the example below. Set “type” to be “SecretObj” and you can determine what keys to be shown in the Credential Panel by setting the values for “schema”.
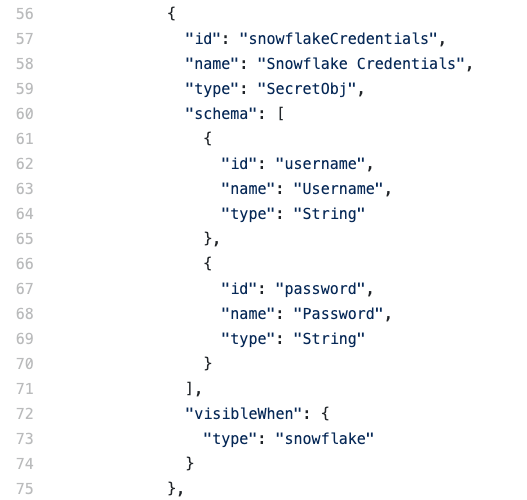
Edit Query
Once you have added data sources, drag the “Execute Query” tile into the canvas. You can give a name to the query in the “Step name” text field.
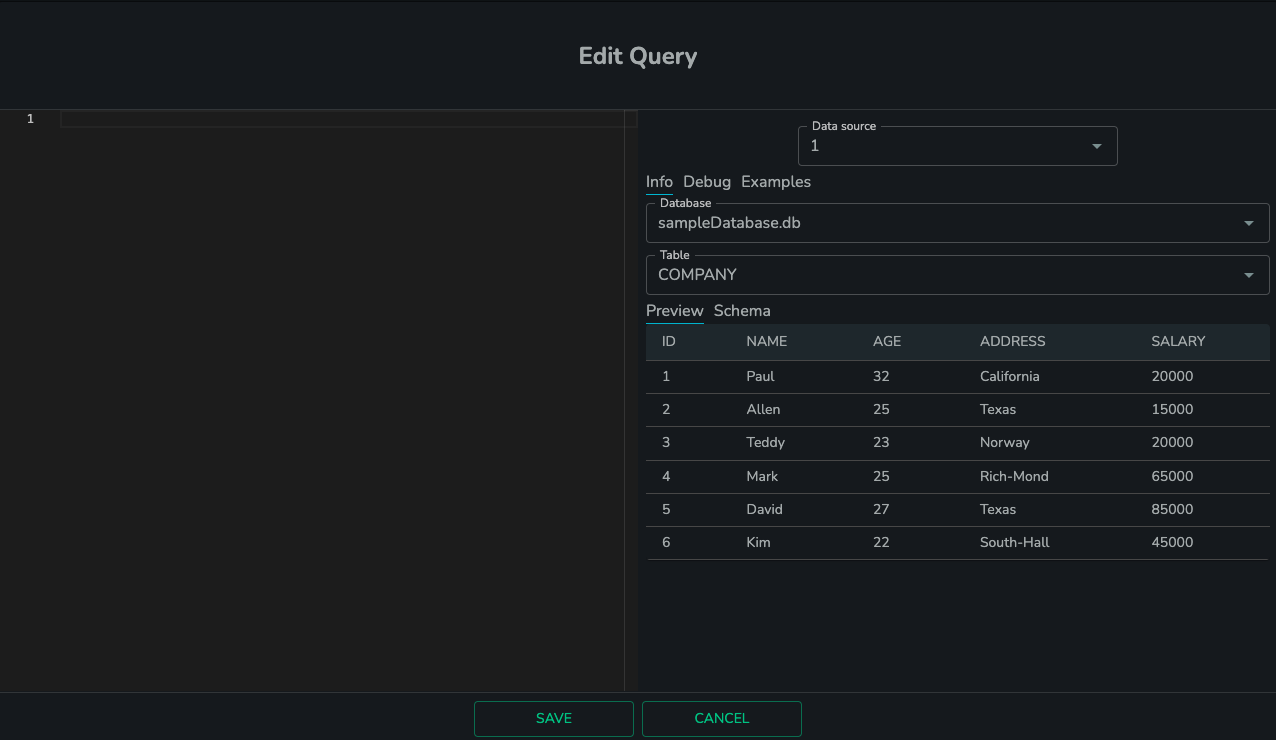
Click “Edit Query” button and you will see the “Edit Query” modal show up. You may see this “Loading information” message if you use this tile for the first time. It may take up to 30 seconds to load the info page depending on size of the data source, but no wait will be needed the next time you open the same window.
Once the loading is finished, you should be able to see the full Info tab with three dropdown buttons of “Database”, “Airline”, “Table”, and two tabs for “Preview” and “Schema”. If the loading page still exists after 1 min, please check the developer tool or logs to see what might be the issue.
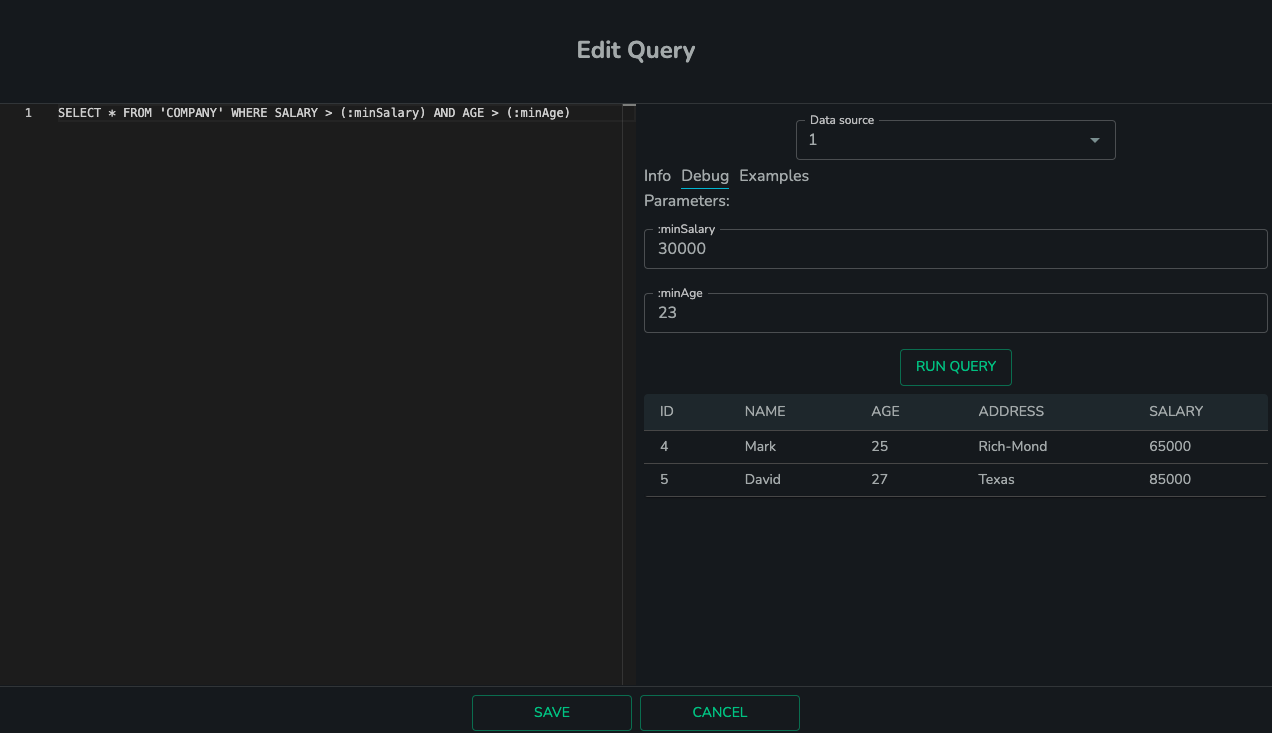
Apart from the Info tab, there is also a Debug tab where allows user to run queries lively for debugging purpose.
SQL queries can be entered in the left panel. You can even set parameters within the query using the format of “:arg1”, and there will be text fields popping up in the right panel. After entering the parameter values, hit the “Run Query” and you will be able see the results within a few seconds.
Hit “Save” button if you want to save this query within the workflow.
Supported Arg Types
- integer, e.g. 10.
- string, e.g. "CA".
- list of integers, e.g. [1,2,3,4].
- list of strings, e.g. ["CA", "UK", "US"].
Syntax:
- Please always enter double quotes rather than single quotes for a string parameter.
- "CA" - correct
- 'CA' - wrong
- You can also pass an array of parameters within one arg block. Please follow the format (see the screenshot below as example):
- Use parentheses around arg to indicate an array, e.g. (:arg1)
- Enter the array of objects with brackets in the arg text field, splitting by comma, e.g. ["Let There Be Rock", "Balls to the Wall"]. Both integer and strings are supported.
Examples
- Query with string:
- Query: SELECT * FROM albums WHERE Title = :arg1
- arg1: "Let There Be Rock"
- Query with list of strings and integer:
- Query: SELECT * FROM albums WHERE Title IN (:arg1) AND AlbumId = :arg2
- arg1: ["Let There Be Rock", "Balls to the Wall"]
- arg2: 2
- Query with list of strings and list of integers:
- Query: SELECT * FROM albums WHERE Title IN (:arg1) AND AlbumId IN (:arg2)
- arg1: ["Let There Be Rock", "Balls to the Wall"]
- arg2: [1,2,3,4]
Wire up Inputs and Outputs
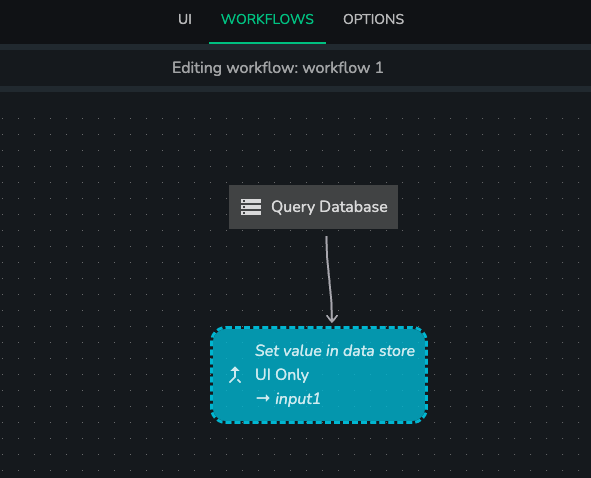
You can use “Input from store” and “Save output” tiles to wire up inputs and outputs with “Execute query” tile.
Supported SQL Syntax and Data Types
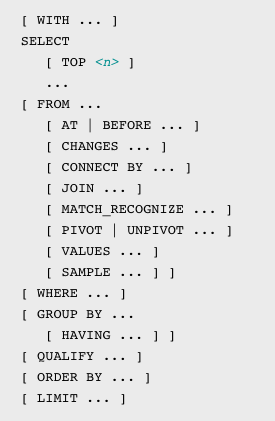
Only Standard SELECT statements following the basic SQL syntax will be supported for current version.
Please find the supported Data Type from this link: https://docs.snowflake.com/en/user-guide/spark-connector-use.html#data-type-mappings
Performance and Limits
Concurrency:
- The maximum number of SQL statements a snowflake warehouse can execute concurrently before queuing them is 8.
Timeout:
- Requests are automatically canceled by snowflake if they run for longer than 172800 seconds (2 days).
Query Size Limit:
- Snowflake limits the size of query text (i.e. SQL statements) submitted through Snowflake clients to 1 MB per statement.
Download Limit:
- The download limit for classic UI is at 100 MB to safeguard the risk of the user’s browser running out of memory and crashing the browser tab.
- Please avoid running commands like "SELECT * FROM table_name" if the table is super large, e.g. over 1 GB, as UI won't be able to render data of that large amount, and an error message would show up. "LIMIT" command is always recommended if you simply want to have a glance of what the data would look like.