Connector Developer Kit
Fundamentals
What is an Xtend Connector?
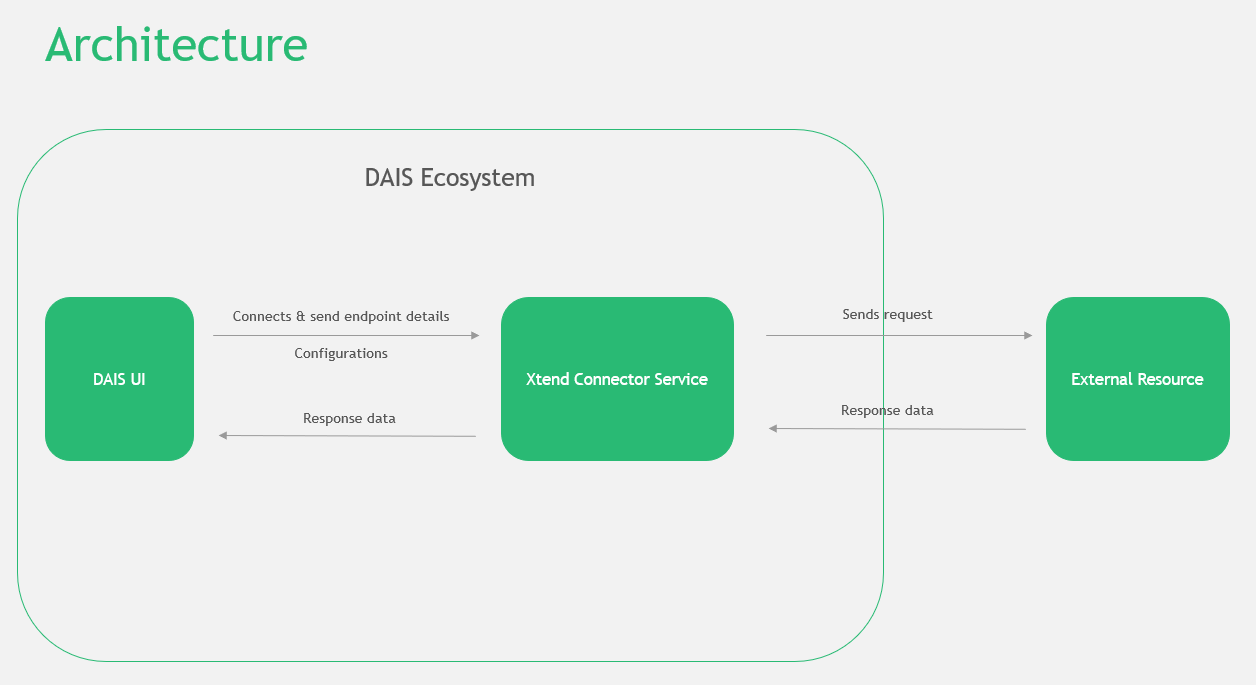
Xtend Connectors are backend services that run within a Dais app and connect to external services and data sources.
As standard, Dais provides built-in Xtend Services such as the Xtend Query Service, which allows apps to connect to SQLite databases stored within Dais, and to retrieve external data from Snowflake.
This document describes how an App Creator can develop their own customized Xtend Connector backend service for their apps.
Why use Xtend Connectors?
Out-of-the-box, Dais provides functionality to connect to both internal and external data sources and services. However, your app may need to connect to other data sources and services, or interact with data sources/services in a way that's not available with the existing connectors.
Fortunately, Dais provides a way for App Creators to create, build, and deploy their own customized Xtend Connectors that can fetch and consume data from any external data source or service that can be accessed via HTTP or HTTPS.
Required Development Skills
Experience in the following areas will be useful when developing an Xtend Connector:
If you do not have experience in one or more of these areas you can still develop an Xtend Connector by following the documentation, but we highly recommend you use the links above to become familiar with any topics you're unsure of.
Development
Prerequisites to develop and use an Xtend Connector Service
The following tools need to be installed on your local machine:
- Python (version 3.9 recommended).
- An IDE for development, such as PyCharm or Visual Studio Code.
- Git (latest version recommended), including Git Bash if on Windows.
Dais Compatibility
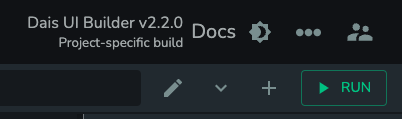
Xtend Connectors are compatible with Dais UI Builder v1.12.0 and later. If you are creating a new app you will automatically have the latest version of UI Builder. If you are developing an Xtend Connector for an older app, you can check that support is available by looking at the version number in the top-right corner of UI Builder while in Edit mode:
You can upgrade to the latest version of UI Builder via the App Releases tab in the App Admin screen.
Artifactory
Artifactory is a repository manager created by JFrog. A repository manager is a dedicated server application designed to manage application artifacts, such as packages and libraries. Artifactory is used to give your custom Xtend Connector access to Dais-related Python packages, such as the SDD package.
- To use Artifactory, you much first get access and create an API key. Please reach out to Dais support/IT support for more information.
- Once your Artifactory account has been set up, you will need to provide your Xtend Connector with the
ARTIFACTORY_API_KEY,ARTIFACTORY_EMAILandARTIFACTORY_REPOSITORYenvironment variables. Configuring Artifactory for your Xtend Connector will be covered in the next section.
Develop a simple Xtend Connector Service
Step 1 - Directory Structure
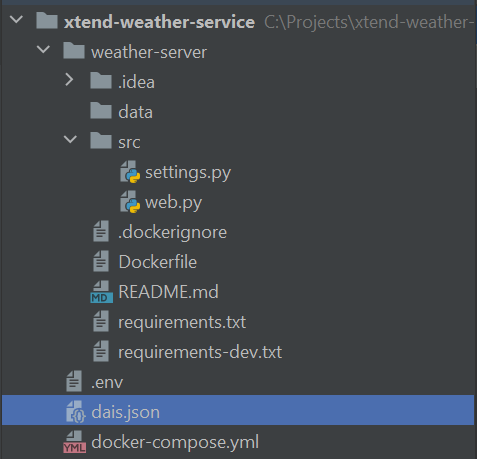
Create a folder for the service at a location of your choice. Your directory structure should look like below. Here we are creating a weather service as an example, but you can name it as per your choice.
Step 2 - Project Structure
The main files and directories are as follows:
- src/: Main code.
- stubs/: Type annotation stubs for mypy.
- tests/: Test code, to be run with pytest.
- tests/test_dbs: Test databases that are copied in the server container to let us play with them.
- .dockerignore: Files for Docker to ignore when building this container.
- Dockerfile: Dockerfile instructions for building this app as a Docker container.
- requirements.txt: Pinned dependencies, required for running the app.
- requirements-dev.txt: Development dependencies on top of requirements.txt
Step 3 - Write a service
Here we will take an example of a simple weather service which provides the weather data based on the name of the city provided as a parameter. Click here to access the complete source code of the service.
While writing the service we will understand some fundamental concepts also like what is an http server, what are Sync and Async requests, logging, SDD etc.
We are using openweathermap.org sample api in this example. You can go to openweathermap.org website and create a free account to get the API Key
a. Firstly login into openweathermap.org and click on your name at top right corner and click the link “My API Keys“
b. Here you can generate a new API key. This API key we will be using in our example to authenticate the endpoints
c. Web Server
We will be using aiohttp library which is an http client/server for asyncio. Basically it allows you to write asynchronous clients and server. To go ahead with this, install aiohttp using following command in your terminal
$ pip install aiohttp
In your directory, go to src > web.py
Import “web“ object from aiohttp so that you can use the various functions it offers as depicted below
from aiohttp import web

async def handle(request):
    name = request.match_info.get('name', "Anonymous")
    text = "Hello, " + name
    return web.Response(text=text)

app = web.Application()
app.add_routes([web.get('/', handle),
                web.get('/{name}', handle)])

if __name__ == '__main__':
    web.run_app(app)
This is a typical server example of using aiohttp. You can refer to this link to understand aiohttp in more detail. Implementation in our example is as depicted below
async def handle(request):
    name = request.match_info.get('name', 'Anonymous')
    user_api = os.environ["CURRENT_WEATHER_DATA"]
    complete_api_link = "https://api.openweathermap.org/data/2.5/weather?q=" + name + "&appid=" + user_api

    api_link = requests.get(complete_api_link)
    api_data = api_link.json()
    if api_data['cod'] == '404':
        return web.json_response("invalid city: {}, Please check your city name".format(name))
    else:
        return web.json_response(api_data)

def create_app():
    app = web.Application()

    app.add_routes([web.get('/', handle),
                web.get('/city/{name}', handle)])

    return app

def main(argv: Optional[List[str]] = None) -> int:
    port = int(argv[1])
    web.run_app(create_app(), host="0.0.0.0", port=port)

if __name__ == "__main__":
    sys.exit(main(sys.argv))
d. Here if you observe in line 3, we are using an environment variable “CURRENT_WEATHER_DATA“ which is stored in .env file to make the application configurable
e. requirements.txt file
This file contains the list of all the project dependencies. If you use any new library in the project, you must include it in the requirements.txt file.
Before running the project, run the following command to install all the dependencies
$ pip3 install -r requirements.txt
f. Now you can go to the terminal and try running the web.py script which you just wrote. Navigate to the directory where web.py is located and run the following command
$ python3 web.py 8081
Here 8081 is the port number(of your choice and based on the availability in your system) which is passed as a parameter
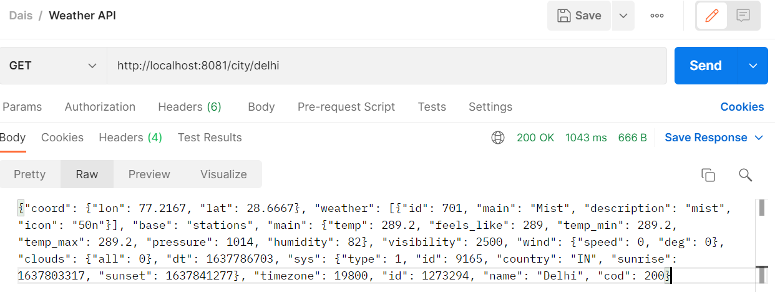
g. You should now have access to the endpoints. Open Postman and try hitting the endpoints to see the results (You can install the Postman if you don’t have it in your system from here )
url: http://localhost:8081/city/<city_name>

http method : Get
Logs
The simplest way to create logs in the application is by writing simple print commands and passing data to be shown in the logs. A sample is shown below where we are printing the name of the city passed as a request parameter
async def handle(request):
    name = request.match_info.get('name', 'Anonymous')
    user_api = os.environ["CURRENT_WEATHER_DATA"]

    print('City Name : '+name)

    complete_api_link = "https://api.openweathermap.org/data/2.5/weather?q=" + name + "&appid=" + user_api

    api_link = requests.get(complete_api_link)
    api_data = api_link.json()
    if api_data['cod'] == '404':
        return web.json_response("invalid city: {}, Please check your city name".format(name))
    else:
        return web.json_response(api_data)
Step 4 - Docker
Docker provides the ability to package and run an application in a loosely isolated environment called a container. Once the development is complete, the project is required to be wrapped up in a docker container. Steps of which are mentioned below.
a. Create a Dockerfile.
Docker can build images automatically by reading the instructions from a Dockerfile. A Dockerfile is a text document that contains all the commands a user could call on the command line to assemble an image.
FROM python:3.8.3-buster AS private-image

#ARG ARTIFACTORY_EMAIL
#ARG ARTIFACTORY_API_KEY

ENV PATH="/opt/venv/bin:$PATH"

RUN python -m venv /opt/venv \
    && pip install --upgrade setuptools pip wheel==0.34.2

COPY requirements.txt /requirements.txt
RUN pip install -r /requirements.txt \
    && rm /requirements.txt

FROM python:3.8.3-buster
COPY --from=private-image /opt/venv /opt/venv

ENV PATH="/opt/venv/bin:$PATH"
ENV CACHE_DIR=/tmp/app-cache

RUN mkdir "${CACHE_DIR}"

COPY src /app
WORKDIR /app

CMD ["python3", "-u", "web.py", "8081"]
b. Run the following command from the directory level where Dockerfile is placed to build an image of your project
$ docker build --tag weather-server .
c. Create a .env file and store the environment variables to be supplied to docker-compose.yml
Please note, the .env file is only to be used for running the service locally. For service to be deployed in Dais, we would need to supply the environment variables through the Dais App Admin screen during deployment.
Note : The .env file (or any other file that includes secrets) should not be committed to the repository (it’s against BCG policy and is a security risk).
d. Create a Docker-compose.yml file
With Compose, you use a YAML file to configure your application’s services. Then, with a single command, you create and start all the services from your configuration.
version: '3.1'

services:
  weather-server:
    build:
      context: ./weather-server
    environment:
      CURRENT_WEATHER_DATA: "${CURRENT_WEATHER_DATA}"
      FILE_MANAGER_URL: http://fm-proxy:8082/files/volume/projects/dummyproject/
    ports:
      - 8081:8081

  fm-proxy:
    build:
      context: ./fm-proxy
    environment:
      DAIS_LOCAL: 1
      DEBUG: 1
    ports:
      - "${FM_PROXY_PUBLISH_PORT}:8082"
    volumes:
      - ./data/file-manager:/data
e. Run the following command to start the service:
$ docker-compose up
f. You can then test the service using cURL or Postman:
Step 5 - Configuring Artifactory
a. Include ARTIFACTORY_API_KEY, ARTIFACTORY_EMAIL and ARTIFACTORY_REPOSITORY variables and values in .env file:
ARTIFACTORY_API_KEY=*****
ARTIFACTORY_EMAIL=xyz@bcg.com
ARTIFACTORY_REPOSITORY="https://artifactorybcggamma.jfrog.io/artifactory/****"
b. Include same values in docker-compose.yml file under args section as depicted below:
services:
  template-service:
    build:
      context: ./model-server
      args:
        ARTIFACTORY_EMAIL: '${ARTIFACTORY_EMAIL}'
        ARTIFACTORY_API_KEY: '${ARTIFACTORY_API_KEY}'
c. In Dockerfile, specify ARTIFACTORY_API_KEY, ARTIFACTORY_EMAIL and ARTIFACTORY_REPOSITORY as input args and store various values in config file as depicted below:
ARG ARTIFACTORY_API_KEY
ARG ARTIFACTORY_EMAIL
ARG ARTIFACTORY_REPOSITORY

RUN mkdir -p /lib/modules/app
RUN AUTH_TOKEN=$(echo $ARTIFACTORY_EMAIL:$ARTIFACTORY_API_KEY | tr -d '\n' | base64 | tr -d '\n') && \
  echo "registry = $ARTIFACTORY_REPOSITORY" > /lib/modules/app/.npmrc && \
  echo "_auth = $AUTH_TOKEN" >> /lib/modules/app/.npmrc && \
  echo "email = $ARTIFACTORY_EMAIL" >> /lib/modules/app/.npmrc && \
  echo "always-auth=true" >> /lib/modules/app/.npmrc
This step is necessary to get dependencies from Artifactory to build docker images and publish npm packages.
Step 6 - Configuring dais.json
The dais.json file is what Dais will use to know which folders in your repository should be deployed and what kind of "model"/container they are. Below is an example of dais.json:
{
    "containers": [
        "name": "weather-service",
        "context": "./weather-server",
        "port": 8000,
        "version": "1.0.0",
        "capabilities": [ "externalHttps" ],
        "secretsEnabled": true,
        "cpuRequest": 1000,
        "cpuLimit": 1000,
        "memoryRequest": 1000,
        "memoryLimit": 1000
    ]
}
- Every time you make any change in the application,
versionvalues needs to be bumped up because while deploying the application, Dais takes reference fromversionvalue in latestdais.jsonfile and compares it with the deployed version and see if there is any change, it proceeds with the build process. - To setup external connection of your service, add values in
capabilitiesfield. Available options areexternalInternetandexternalHttps.externalHttpsis recommended overexternalInternetgiven it’s more secure. - Contact the Dais Team at
dais@bcg.comto confirm that the cluster/VM you are using supports external connections.- Note: External Internet connection is only available on production clusters, not Creator. Please email
dais@bcg.comto request access to a production cluster.
- Note: External Internet connection is only available on production clusters, not Creator. Please email
- CPU and Memory – There is an option in
dais.jsonwhere you can configure required CPU and Memory for a specific project as depicted in the image above.cpuLimitandmemoryLimitvalues indicate the maximum CPU and memory resource that can be allotted to a project. - To make any change in the CPU and Memory limits, please email
dais@bcg.com. - To enable secrets, including external service credentials, to be passed to your service, add the
secretsEnabledkey and set it totrue. Secrets can then be specified via the Secrets tab in Containers page: - Optional container
typevalues include"model"(Docker Model Runner) and"ui"(UI-serving container used withcustomUi).
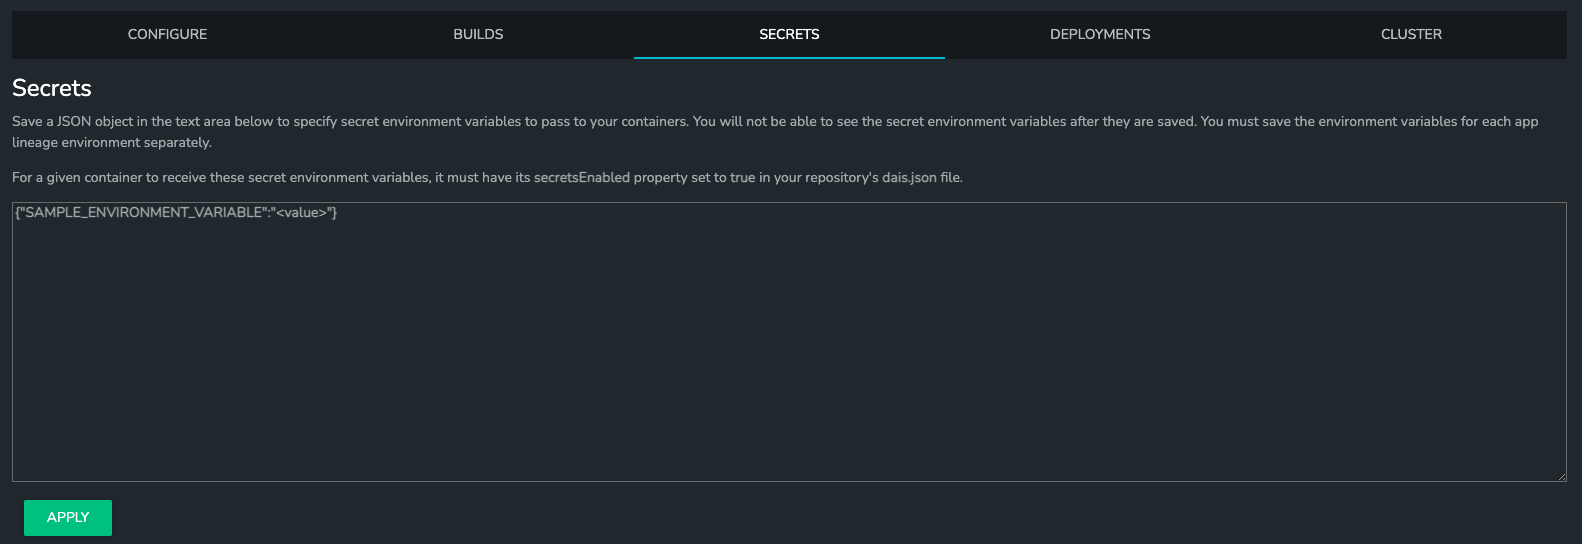
Each secret specified will be made available to your service as an environment variable. Secrets are specified in JSON, where the key is the name of the environment variable, and the value is what the environment variable will be set to. The keys must be uppercase, and must start with an alphabetical character, with the following characters being either alphanumeric or the _ character. For example:
{
    "AWS_ACCESS_KEY": "12345"
}
can then be retrieved in your Xtend Connector Python code using:
aws_access_key = os.environ.get('AWS_ACCESS_KEY')
where aws_access_key will be set to 12345
Step 7 - Create a Git Repository
You need to create a Git repository to make the service deployable in Dais. Use following steps to set this up:
a. Create a new repository
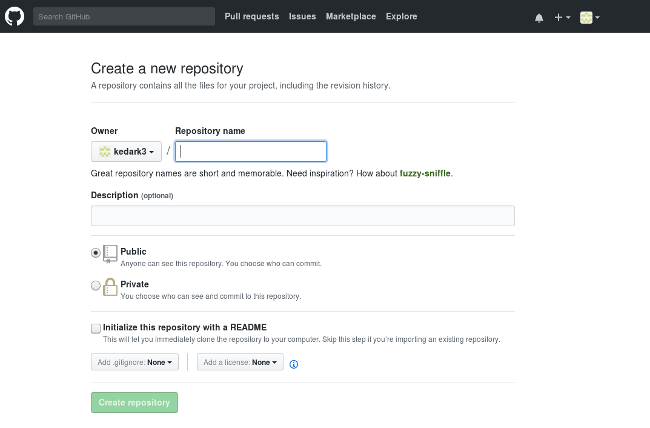
b. Git Access Token – You would need Git Access Token to be able to build your service in Dais
- To create the token, go to you repository in Github
- Click Settings from top right menu
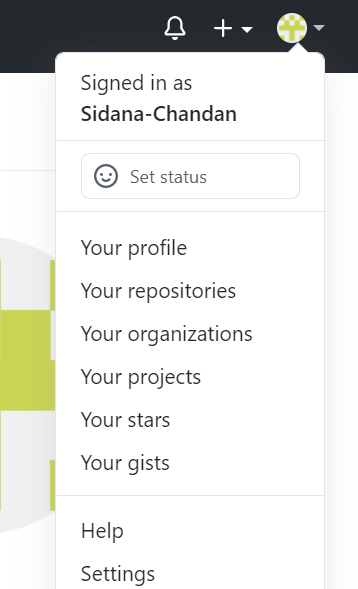
- Click on “Developer settings“ from left menu
- Click “Personal access tokens“ from left menu
- Select the scope and click on “Generate token“. That would provide you with a unique token
c. To tell your computer that project is a directory managed by the Git program, navigate to the root directory of your codebase and enter:
git init
d. Then, to tell the Git program you care about all the files and want to track any changes from this point forward, enter:
git add .
e. Make a commit
git commit -m "first commit"
f. Connect your GitHub repo with your computer
git remote add origin https://github.com/<your_username>/<repo-name>.git
g. Push the changes
git push -u origin master
Build and Deployment
a. In the Dais App admin panel, go to Containers page from left menu
b. In Configure tab, configure the app to deploy service to Dais
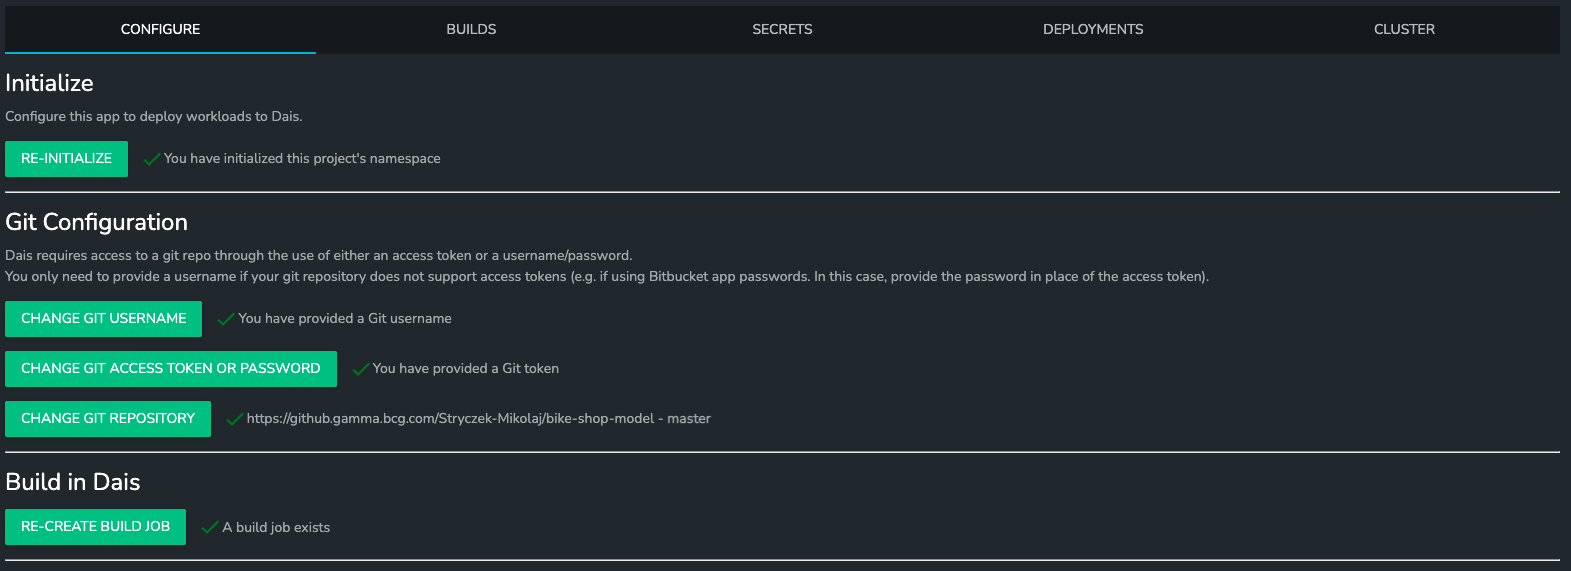
To work through this configuration page, you will need to:
- Click the Initialize button.
- Associate your personal access token with this Dais project
- Specify the GitHub repository that you created in previous section
Finally, you should be able to click on the Create Build Job button at the bottom (A build job is a particular defined way of compiling, testing, packaging, deploying or otherwise doing something with your project)
c. Secrets Tab - This section will take the variables and their values which are required to be available as environment variables.
Note – The name of environment variable needs to be applied in all upper case.
d. Build tab – Go to builds tab and click on BUILD NOW button to build the service. You can click on logs icon to see the logs and diagnose if there are any errors
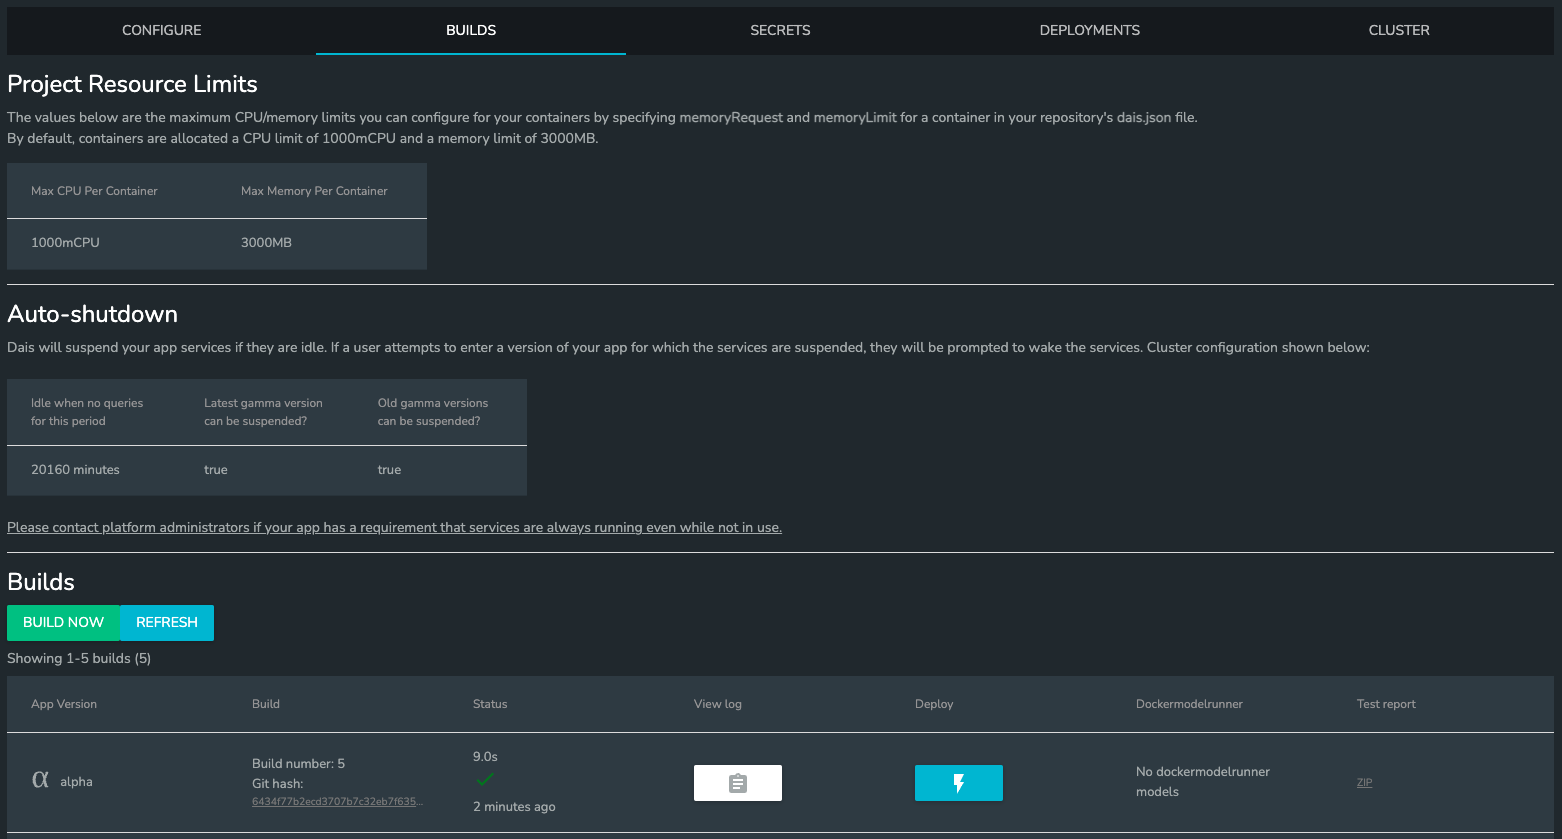
The logs will appear as follows:

If you see “Finished: SUCCESS“ at the end of logs, that means build was successful
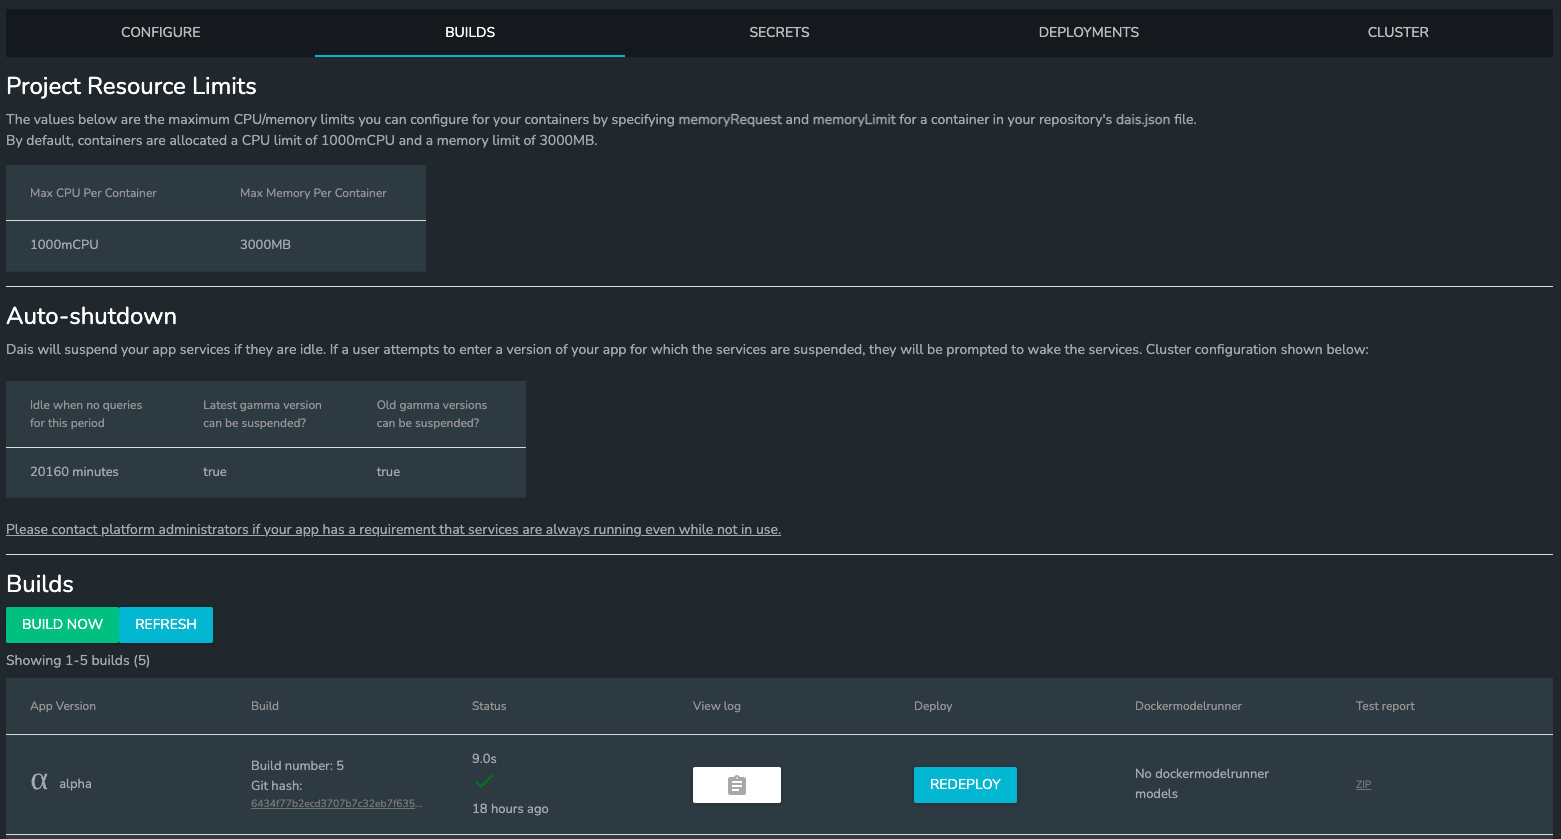
e. Next step is to deploy the service to Dais.
Click on the lightning button to deploy the service. Screen should look like below after successful deployment
f. CLUSTER tab : You can see the logs at pod level to make sure the service is running fine
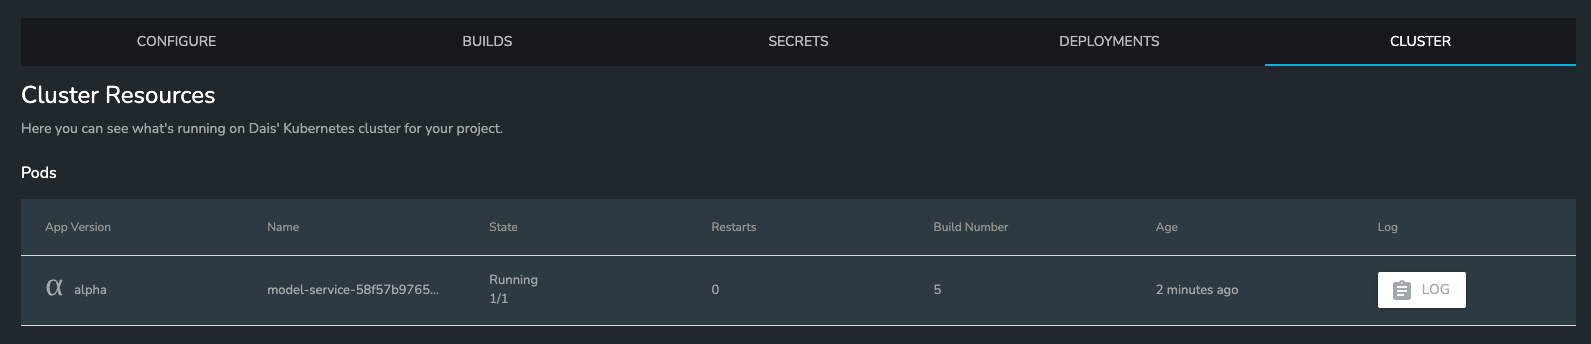
In the Cluster tab, click on log icon to see the logs which looks like below

It’s time to use the service in Dais app workflow.
How to use the service in Dais app workflow
a. Open the app and click on any scenario in which you would like to use the service.
b. Click on edit icon at the bottom right corner of the screen and then click on workflows tab at the top center.
c. Click on “New Workflow“ link
d. From right panel, drag and drop the “Persistent-service request“ and configure the details in left panel.
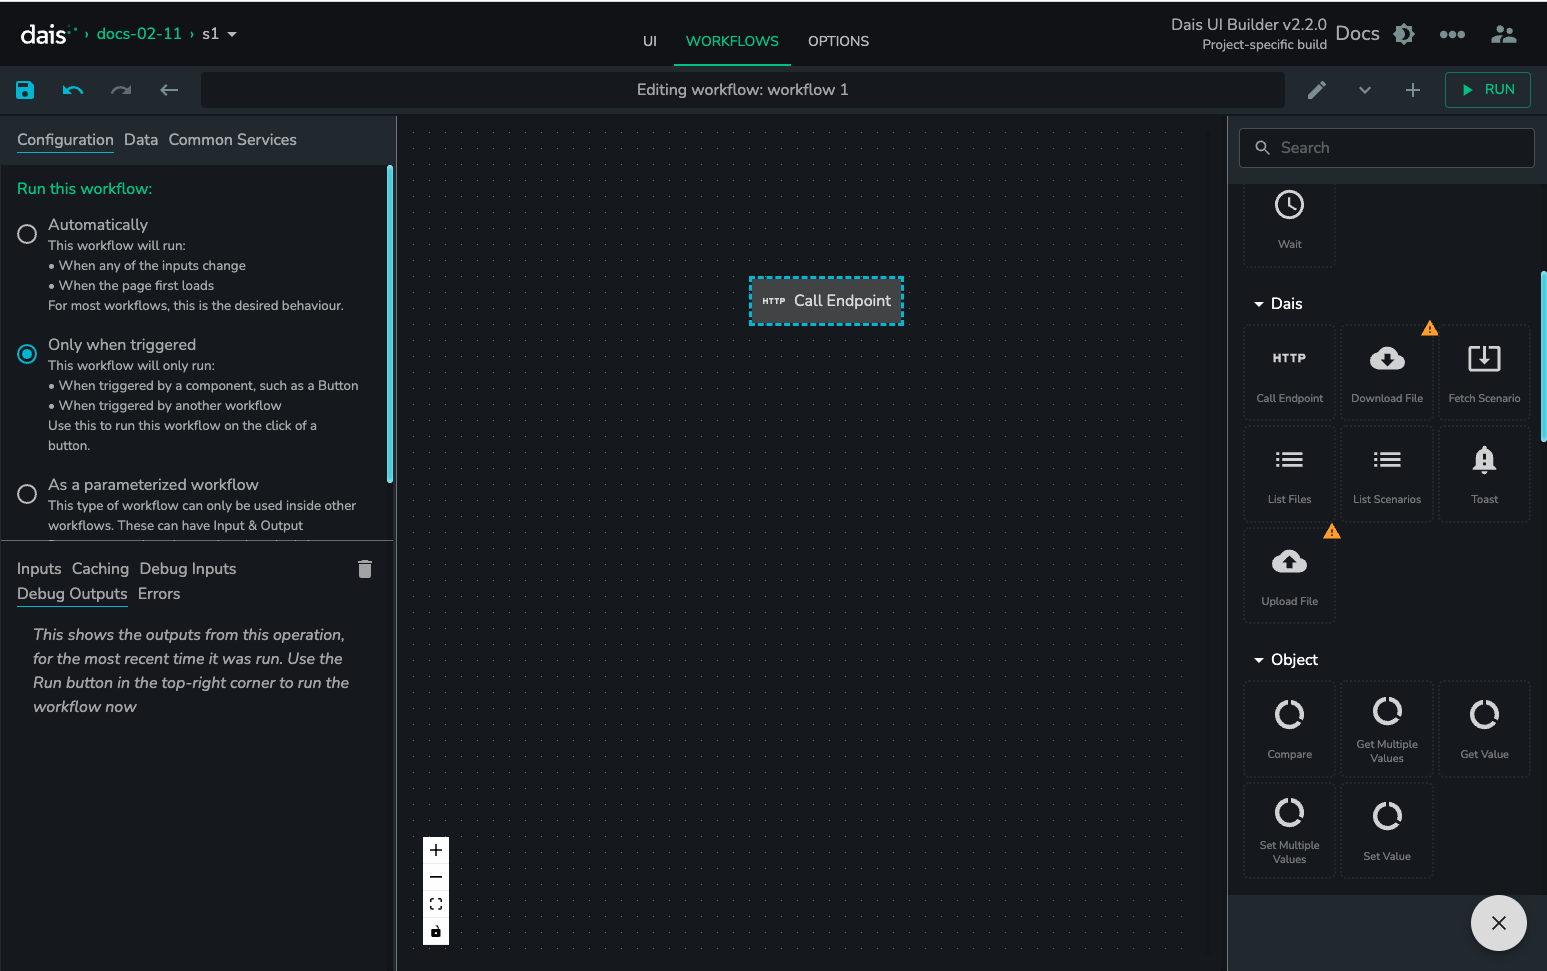
e. In the left panel below, enter the Service Name as mentioned in dais.json file, endpoint details which you would like the service to hit and get the data, query parameters(if any), HTTP method etc.
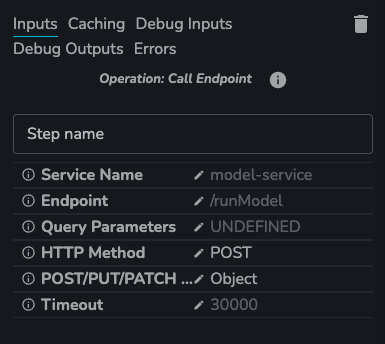
f. Disable caching under caching tab because if we don’t change the endpoint details the response might not get updated if the data gets changed in backend.
g. In the upper left menu under workflow triggers, select “only run when triggered value“.
h. Now hit the “Run“ button placed at the top right area of the screen.
i. The step would hit the service and bring the response as illustrated below. You can check the response in the Debug Outputs tab in the bottom left panel.